Home Cockpit build and upgrade
Matt takes us through the ups and downs of building and expanding your home build cockpit
Introduction
Disclaimer: Information contained within this document is for educational purposes only, FlyUK is not able to help troubleshoot your home cockpit build. There are plenty of forums such as mycockpit.org and cockpitbuilders.com better suited to assist.
When most people think of a “home Cockpit”, they think of a full-size 737 flight deck sitting in the spare room of someone’s house, the owner probably having just spent many thousands of pounds having it installed. However, a home cockpit can be anything from a computer and joystick, all the way up to a full-size cockpit. Today more than ever, it is easy to build something that makes your simming experience more immersive and realistic, which is the ultimate goal for most simmers. This can be as simple as upgrading from a joystick to a yoke or purchasing a set of rudder pedals. The following is laid out as inspiration and as a guide to making some home sim improvements. It is aimed at the in-between group of simmers, who want more than just a joystick sitting on their desk, but don’t want to spend thousands on a full home cockpit right from the start. When I refer to home cockpit building, I am referring to all types of build, from a desk set up through to a full flight deck build.
As a side note, combat sims won’t be addressed in this article, mainly airliners. Also, I am assuming if you are reading this, that you already have a sim of choice (P3d, X-plane or MSFS), so I won’t be covering the merits and pitfalls of these either.
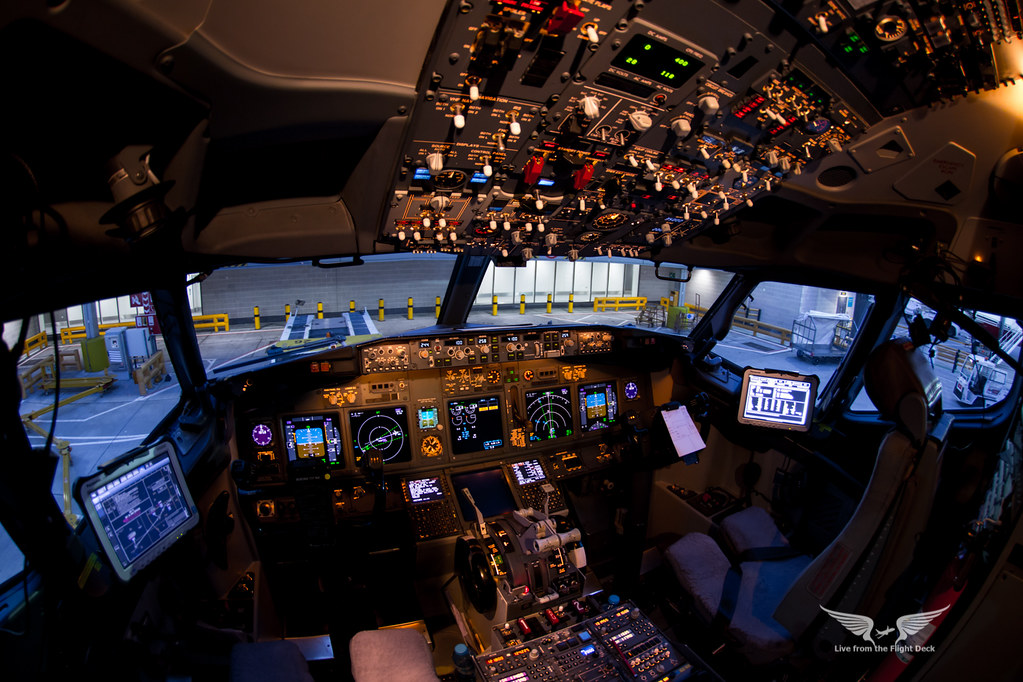
About me and why am I talking to you about this? I have been simming for around 27 years now (a drop in the bucket compared to some of you out there), but for the last 15 years I have also designed and built a number of home cockpits, some for myself and some for friends. These range from a simple setup with an extra monitor and a wooden structure, to the entire left side of a 777 flight deck you can see in the images below. This can be challenging when most of my builds have been based around a single computer, using software like PMDG and maybe 2 x graphics cards in one computer.
Away from simming, I have been a professional pilot for 17 years, flying various types. Initially starting on turboprops and then moving to jets for the last 13 years. I am not endorsed or paid by any company for writing this, these are just my observations over the years. Also, the review is my personal opinion and cannot replace your own research.
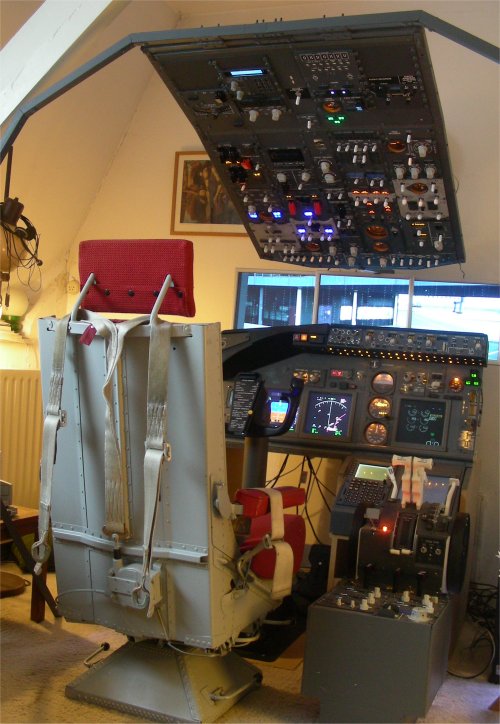
777 home cockpit, panels made mainly from wood.
So, to the matter at hand, home cockpit building. Once you get the bug for home cockpit building, you will quickly come to realise, there is almost never a “finished cockpit”, there is always something else you can add, or make better. It is a hobby that if you let it, can cost a lot of time and money. My first piece of advice would be to figure out how far you want to take it and what is your ultimate goal. This usually comes down to space and money. I would include knowledge here, but flight sim products are so readily available now that you can get a lot of hardware that is plug and play. Also, there are so many Google articles on the subject, so that you can read up on almost any part of the cockpit building.
With that in mind, the cost is usually the first thing people worry about when they think of home cockpits. I will not argue, you can easily spend anything between £1 and £1,000,000 building a home cockpit. However, most people do it over time. I treat it as a marathon and not a sprint. If you buy a second computer monitor here and a throttle there, it adds up to the finished product. If you want a finished 737 home cockpit delivered and built for you, including all the projectors, computers, hardware and fittings, the cost is probably eye-watering. I have spent more than I care to talk about on home cockpits over the years, but there are a lot of ways to save money, which I will come onto later. The bottom line, you don’t need to spend a lot of money to have an immersive setup at home that makes you feel like you are actually there. That's the goal right, make whatever your current setup is a little better, one step at a time.
One caution I will add here. Whatever the budget for your build, add a small margin for error, taxes, things breaking, extra cables or software you didn't know you needed and all the other things in between. I can't tell you how many times I have bought hardware, positioned it in my home cockpit and realised the cable they provided isn't long enough to plug it into my computer where it is currently situated. These additional costs aren't usually much, but if it happens a few times, you will start to learn it is the price of building a home cockpit.
Research. Now you have decided you want to build something a little more advanced than just a joystick on your desk, step one is research. For every build I have done, I have probably spent double the construction time researching what I want to build, it is by far the most important part of the home cockpit build process. This will save you time and money and in the long run make the whole experience more enjoyable. Most people fall in the category of wanting to fly multiple types of aircraft when they sim. A lot of virtual airlines (FlyUK included), allow you to fly more complex types as you progress through the ranks and the last thing you want is for your hardware not to be compatible with the aircraft you want to fly. Whatever you decide to buy, don’t be afraid to signup to forums or email the manufacturer. Most websites will have a list of product compatibility to help. However, if your ultimate goal is to make a large home cockpit that looks like an airliner, but you want to do it over many years to spread the cost, just be mindful when buying components that you get the correct type for the aircraft you want to build and that they have good compatibility. If you fly combat sims as well as airliners, a joystick is probably better than a yoke if you can only have one. If you fly more Airbus than Boeing, a sidestick is probably the way to go. My usual technique is to think long-term and decide what my ultimate goal is. Then decide what items I need to purchase or build for that goal. I then research the cost of all that and then decide if I have the space and can afford to build it or not. Then I adjust my plan and so on. Google images, Youtube and cockpit building forums can give you a wealth of inspiration, not to mention measurements and drawings.
Before we get into the meat of it, a word on VR. There are people in the flightsim community who swear by VR and would never go back to flying without it. There are also people who don’t like wearing a headset for a long period of time and can get fatigued from a VR headset. I went through a period of using VR headsets a few years ago. Shy of building a 1-for-1 replica home cockpit, you cannot beat the immersion a VR headset gives you. You put that thing on, and it is honestly like you are sitting in the real cockpit, it is immense. If you ever get the opportunity to try one, I recommend it. However, whilst I didn’t get headaches from them as some people do, it started to strain my eyes and neck after using them for a while. Long-haul flights at this point would be pretty challenging. Also, I like the feel of pressing buttons on actual hardware, this is made a little more difficult with VR, not to mention the cost of a decent VR headset. So, there are those who swear by them and those who prefer a monitor or multi-monitor setup. I am in the latter camp for the reasons I mentioned. VR technology is evolving all the time though, and I am sure it won’t be long before blended VR is here and you can see the outside world and your home cockpit yoke or switches in the background too. For these reasons, I won’t be talking VR here again, however there are plenty of articles out there to help you choose if you decide to go down that route.
Finally, remember Ebay, Amazon and Cockpit builders forums are your friends. You don't have to purchase brand new items when something used will do. Particularly if you are figuring out what is important to you and what you can live without.
Space. How much space do you have to play with? The second thing I hear most when talking to people about home cockpit building after cost is “I only have the space my desk sits in, so I don’t have much room”. You’ll be amazed how much you can fit on the floor space of a desk. A 737 Jetmax home cockpit actually takes up around 100 x 50 cms, most desks aren’t much smaller than that. The below image isn't a pre-built jetmax cockpit but takes up the same floor space. It eventually turned into the 777 cockpit you see in the previous chapter.
I am assuming most people reading this would want to go down the single-seat home cockpit route for space/cost, so I will proceed with this assumption. If you have the space to build a first officer seat, I recommend it. That way when you have finished your construction, you can have a like-minded friend over to help. Very rough dimensions and don’t quote me on this, but if you have 150 cms x 50 cms floor space, you can probably fit the main instrument panel of a 2-seat cockpit in. Clearly, you have to then put seats in etc, but that’s a rough outline. These dimensions do not include the FMC bay protruding out in front, or then the throttle quadrant and any other pedestal parts you wish to add.
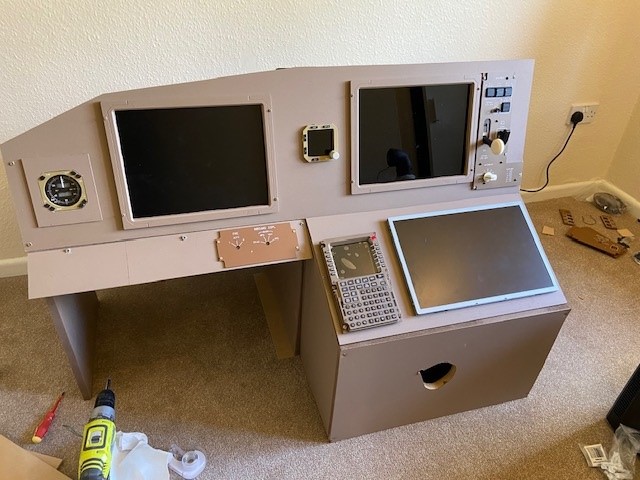
The main build here is 100 x 50 cms (not including the FMC bay). The second build sits on top of a desk.
Flight Controls.
After you have done all your research and figured out what you want to make or upgrade let's first talk flight controls. By this, I mean stick/yoke, rudder pedals and throttle(s). Even down at this fundamental level, there are huge variations in price and quality. My next piece of advice would be, if you can afford to, don’t skimp on these 3 items (particularly stick and throttle). They are what you will interact with most when actually hand-flying your airliner of choice. There is a huge amount of choice when it comes to picking which set or combination you will be working with. I will add the following disclaimer that I have not used all of the controls I will mention but will reference other reviews and confirm data where I can.
Stick/yoke. I am not going to mention every yoke available on the market. Bottom line, do your research and see which one works for you. However, I would like to point out one interesting combination I think is a great starting point for people. That is a combination of the Thrustmaster TCA Boeing Yoke, and Airbus TCA Sidestick. In my view, if you purchased these 2 flight controls, you can now successfully fly most of the airliners that are out there to date (assuming you want to fly an Airbus with a stick and Boeing with a yoke). I have personally tried both of these products and like them very much. I feel the throttles leave something to be desired, so I would personally go a different way with the throttles which I will talk about a little later. However, for the stick and yoke, I think a combination of these 2 would be a great addition. As mentioned, don’t buy them all at once, buy them apart and then you can spread the cost. If you can only buy one, I would recommend the yoke slightly over the sidestick, unless you fly more Airbus, then choose the stick. Honeycomb Alpha also has some great reviews, but there are plenty of choices out there. you can find reviews on most yokes on the market, making research easier.
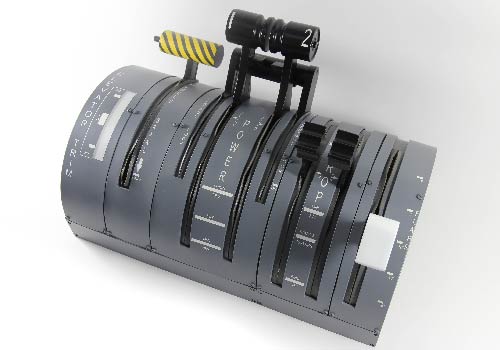
Throttle. I actually owned the Saitek throttle quadrant for a long time. They are so versatile and have so many additional levers and mods these days that they are a good entry-level purchase for the price. If you purchase a couple, you can mount them side by side and make a 747 throttle and add levers etc. I even once turned one on its side and used it as a tiller. That came with some other issues though and I will discuss tillers later on.

Saitek Throttle with addon 737 levers and speedbrake.
However, if you want to step it up a notch, my recommendation would be to use the Honeycomb Bravo throttle, with the previously mentioned Thrustmaster Stick and yoke. It can be used as a Boeing or Airbus Throttle and aftermarket handle sets are now available for both types. There is also a turboprop lever attachment for those wishing to take a break from jet flying.
If you fly exclusively airbus (or can afford it) then despite my earlier warning, I would semi-recommend the Thrustmaster TCA Airbus Throttle Quadrant and Add-On as an addition. This adds the throttle and the various switches designed for airbus operation. But most importantly, gives you the throttle detent used in an airbus aircraft, which I don’t believe the Honeycomb Bravo has. Figure out what you want to fly and go from there. There are high-end companies that make aircraft-specific throttles that are very good and excellently made (Throttletek, for example). If you fly one type then great, but just be careful about purchasing a throttle for one type if you fly a lot of different aircraft, as some throttles have detents for things like FADEC and some don’t.
Throttletek Q400 Throttle Quadrant.
Rudder Pedals. In my opinion, these are the least important of the 3 to go high-end on. Don’t get me wrong, they are important to own. There is nothing quite so immersion-killing as lining up for a crosswind takeoff and having to twist your joystick or use your keyboard to control the rudder. However, not as important for the feel to spend a huge amount of money on. I have used Saitek Rudder Pedals for years and they have never steered me wrong (literally). There are also plans on the internet that modify the Saitek Pedals to make them look more like Airbus or Boeing pedals. A quick Google image search of home cockpit rudder pedals will stand you in good stead for what's available. There are plenty of high-end pedals that will be more immersive, but of the 3 flight controls, I would say this would be my lowest priority to upgrade, at least initially. As always though, do your research.
BLUF: if you have the Thrustmaster Yoke, Airbus Sidestick, Honeycomb Bravo throttle and Saitek Pedals, you can cover almost any aircraft you want to fly.
Monitors. So, now you have the big 3 flight controls, where to go next? I honestly think this depends on what you want your final setup to look like (remember that research thing I keep talking about). If your plan is to just use one monitor with the virtual cockpit, then I would say upgrade your monitor to a TV or large monitor. If you have a good enough graphics card (doesn’t actually have to be amazing), then it should be able to handle a TV instead of a monitor. This will obviously give you a better view and help create that new level of immersion you are looking for.
Headset. Next, I would say purchase a headset. Preferably one with a microphone. This will allow you to fly online and talk to other aircraft too. Not to mention, trying to keep the engine noise down is a bonus for anyone else in the house, not wishing to hear your aircraft taking off at full power. Most gaming headsets will work well and you don’t have to spend a fortune to get a decent one. There are adapters for real-world aviation headsets too, just make sure you know what jack it comes with and if it fits your PC.
Tracking. To finish off the sound/visual part, I would add something like TrackIR. This will allow your head to be tracked when you move, so instead of having to pan the view around the cockpit, you can now hands-free look around. It is an alternative to VR that allows more realism without the bulky headgear. It clips onto your headset and is not very obtrusive at all. I have used this before and for a single monitor use, I would recommend it. If eventually, you want to go down the route of having multiple monitors for the visuals, then IR tracking may not be the best solution for you.
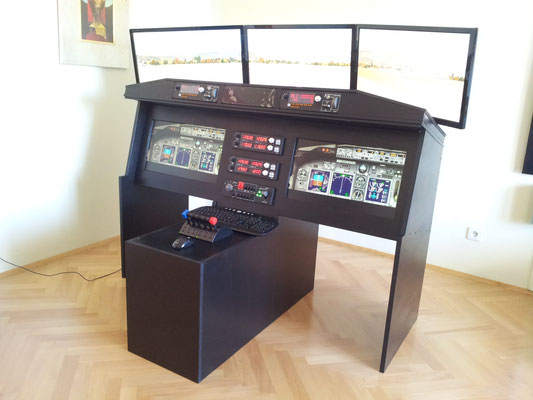
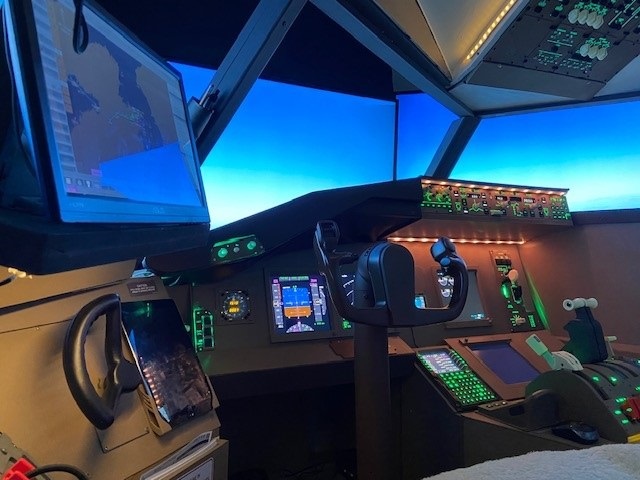
Multi-monitor visuals with no need for a virtual cockpit.
FMC/Autopilot
The next purchase I see made most of all (and for good reason), is either an MCP (autopilot unit), or an FMC/CDU. Some people will prioritise these over the previously mentioned better screen, headset and tracking software, if that is your priority then go for it. I recommend it this way so that you can start to increase your levels of immersion and then add more hardware to the setup. If I had to pick one between an FMC/CDU and an MCP/FCU I would say my first purchase would be an FMC.
FMC. You spend quite a bit of time programming this on the ground and updating it regularly during the flight. Whilst the MCP is very useful to have to decrease the workload on a busy approach, I think you will get more out of an FMC in the overall simming experience. So, which FMC? It’s at this stage that things get a little more niche. Sadly, an Airbus FMC will not work with a Boeing and vice versa, so you need to pick what requirements you are looking for. Most people have an iPad at home these days and if not, you can pick one up pretty cheaply. Companies like Virtual avionics and Simserver allow you to download an FMC/CDU to your iPad and use it as a touchscreen. This is not available for all aircraft, so check their website for which aircraft is available, but it is a cheap alternative to be able to have an airbus CDU or Boeing FMC available as a touch screen to hand. Alternatively, if you fly one type, you can purchase an FMC replica. There are several companies out there that make actual replica FMCs, and this can increase your level of immersion no end (Flightdeck Solutions, CPFlight, Opencockpits etc). It is a great feeling to have an actual FMC unit to manipulate before a flight.
Autopilot. So now we have an FMC, let's talk autopilot. Similar to the last conversation about FMCs, autopilots don’t usually work with both Boeing and Airbus aircraft, as they are so different. One way around this is to purchase an entry-level Saitek Autopilot panel and use it in conjunction with a program such as SPAD or LINDA. These are scripting programs you can download. Sounds complicated, but thankfully many people have gone before us and made profiles for most aircraft. So you essentially download the profile for the aircraft you want to fly and use that. It is a quick way to use a single autopilot unit with multiple aircraft for not a lot of money. A word or caution here though. With anything that is user made on the internet, not every switch on the panel will work with every aircraft. So again, do your research. If you want to step it up, a Goflight autopilot panel is great for the 737 (and I think it works with other Boeing aircraft). I am not sure if Goflight is still around, but you can usually pick one up from eBay. Google is your friend and you can easily spend a lot of money on an autopilot panel. A good one from Flightdeck Solutions or CPFlight etc will cost more, but they are great units! Tip: don’t forget the EFIS unit to go with it to control your displays.
Wood /More Monitors/EFB.
I am sure many of you reading this have so far been nodding your head saying, "tell me something I don't know". Well, this next section is usually where most people haven't spent too much time thinking about when it comes to home cockpit building...
In my opinion, the most underrated part of any home cockpit build is wood. Wood can increase your immersion level no end for a relatively cheap cost. A simple structure either resting on top of your desk, or a standalone build in its place will instantly add to your cockpit feel. It is also the place that most people get to and stop their home cockpit build. Instead, they keep piling more and more hardware onto their desk and it becomes extremely cluttered. You end up having to move items around and compromise where you want to put things in order to fit all your hardware. It is almost like a desk is the last safety net people don't want to let go of because it means they have taken the leap into cockpit building, they can no longer hide their hobby with a quick arm sweep of the desk if people come to visit and want to look in the sim room. "I need my desk to work from, so I cannot build anything", is also something I hear quite often. However, most people could easily fit their desk and some form of small structure made from wood into a single room. That way, you can work on your desk and then use the cockpit for simming. If you want to do things properly, I suppose starting the whole build with wood from the ground up is the way to go. However, if you have most of the components already, then you can decide what goes where and what you want to make (not to mention if you own the components, you already have all of the measurements you need).
Above: A typical desk setup with a few bits of added hardware. It wouldn't take much more to start looking cluttered.
Above: The beginnings of a wooden structure, seen here holding a radio, autopilot panels and the yoke.
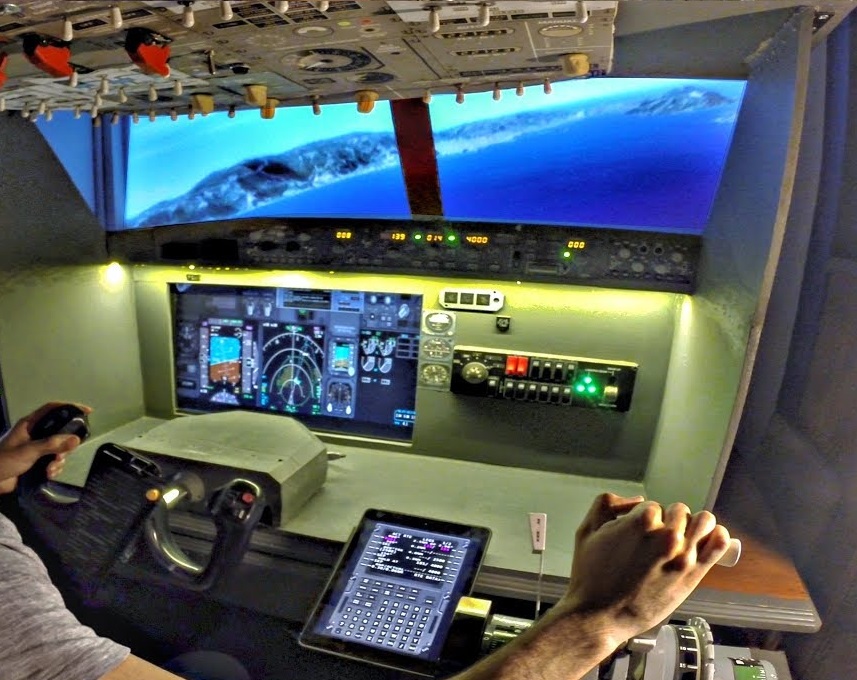
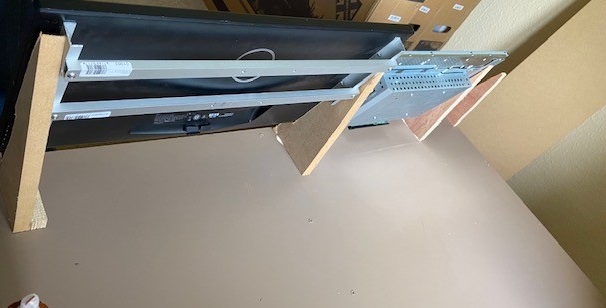
Above: Ignore the fact this setup has GA instruments on the monitors. Nothing stopping you from having a setup like this with undocked 737 instruments on there. If required, something like this, made from wood, can even rest on your current desk setup. Note the 2 x Saitek yokes and throttle, this shows how easy it is (and with limited space), to add a right-hand seat if you aren't worried about exacting dimensions.
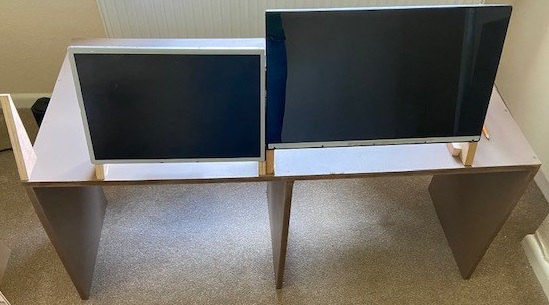
Above: I really like the above images. It is the same build, from desktop at the start to the full cockpit at the end. You can see how the second picture is already starting to look good. You could replace the 3 monitors for exterior visuals with one bigger tv if you were limited by graphics card outputs.

A great set of photos showing progression in this simple, but very effective 2 seat home cockpit.
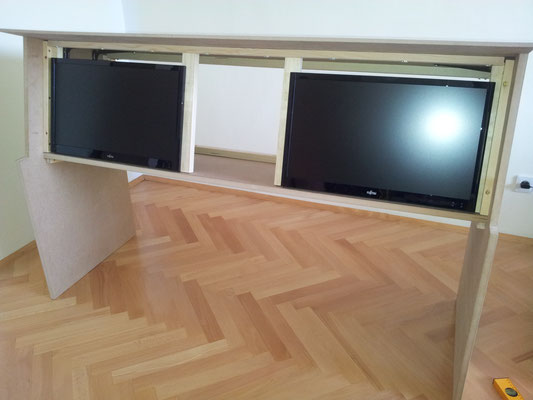
Woodworking. I will be the first to admit, I am not great at woodwork and I think ability/having something potentially looking less than professional puts a lot of people off. However, some DIY stores will cut the wood down to size for you (especially if you tell them you need it that size to fit in your car). Just make sure they have a wood-cutting service before you purchase. Alternatively, just purchase a cheap jigsaw and do it yourself. This is the way I have always done it. Just take your time and provided you have some basic measurements, you can make just about anything. You can easily make a structure with a few pieces of wood that will hold your rudder pedals in place, your addon hardware and even the yoke and throttle too. It also helps, for the items I would put next on the sim building list, more monitors.
Simple wooden structure to hold more monitors
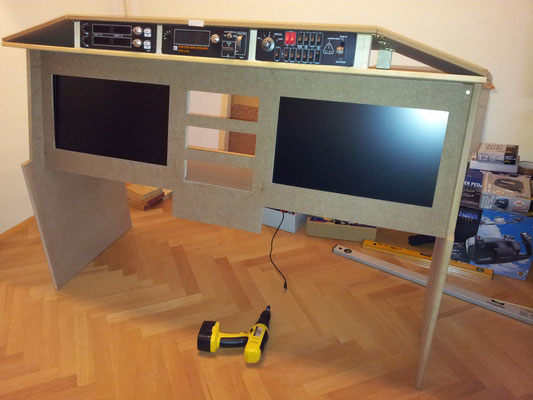
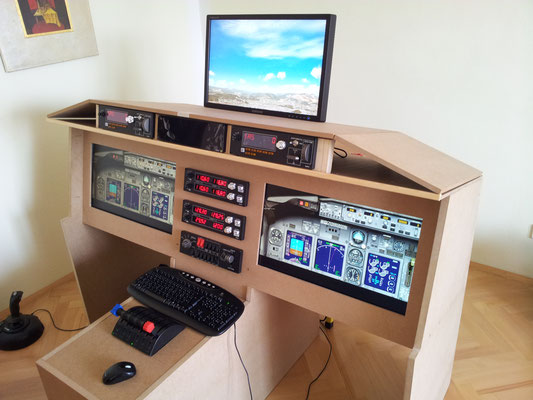
Monitors. Being a pilot in the real world, I can attest to how much my eyes move on a final approach. Bouncing in a scan between the VSI, airspeed, runway, ILS needles and heading etc. Adding a second monitor to your home cockpit build is a great way to help with this. Most add-ons these days have pop-out instruments such as the PFD and ND. Just pop them out and undock them to your second monitor and now you have a mini panel on another monitor. Make sure your graphics card has a second output connection (HDMI, VGA etc) and you are good to go. Now throw some wood in front of it in the form of a face plate and you have the makings of an instrument panel. Go grab some paint and it will soon start to feel like a cockpit. My previous completed setup had 7 monitors running from 1 x PC. This had 2 x graphics cards and ran the PMDG 777. I had 3 x 55-inch TVs for the visuals, 3 x monitors for the instruments and the last was the FMC. So really the limits are your imagination and how powerful your computer is. You can spread the load around various computers on a network if you have the correct software (see software chapter).
Top tip: If you build any structure from wood. Put it on a small base with some cheap caster wheels under it. That way you can move it around to work on it or roll it into the closet and out of the way if you need to.
Believe it or not, the above 3 images are the same build at different stages. All with wood for the main panel and a few monitors behind. The different faceplate on the 777 cockpit on the right, but the same base.
Electronic Flight Bag (EFB). I recommend at this point investing in a good EFB. Some aircraft come with one built-in (such as PMDG) but having an EFB on a second monitor is really useful. Also, products like Aivlasoft EFB are really good for navigation, planning a route and finding out if online atc is available. If you purchased that second monitor, you can alternate between an EFB and the pop-out instruments you have placed there (or purchase a third monitor if your budget and graphics card can take it).
Tiller / Radio Panel / Switches
Tiller. I never considered buying a tiller until a friend pointed out that he had one. I previously mentioned I tried to experiment using a Saitek throttle turned on its side and using one of the levers to move left and right. This didn’t work so well as tillers normally re-centre (the same as most other flight controls do). The good thing about a tiller is that despite most of them being aesthetically different, once you have one, it will work with most aircraft. I didn’t realise just how immersive it is, steering the aircraft on the ground with a tiller before lining up and using the rudder during the take-off roll. I recommend Roland Schiller Tiller. Really sturdy and worked great out of the box for me, it is also a great price. There are others out there (such as Cat3design), but they seem to be on and off as to when they are manufacturing.
Radio panel. This can be purchased at any point during your build, but I feel like this is a pretty logical point to purchase a unit. The entry-level is the Saitek radio panel. With the use of some software (SPAD), it can be programmed to work for most aircraft. I use the Opencockpits plug-and-play units and they have worked well for me with a relatively easy setup.
Switch panel. We have a lot invested in our home cockpit so far, but one thing we have been missing is some general buttons. These can come in the form of an overhead or just a switch panel. The Saitek switch panel is the entry-level panel that comes to mind. This includes several switches, a gear lever and an alternator/starter switch. This can be used for airliners too, using FSUIPC. This is a great piece of software that allows you to program buttons in the cockpit (I am assuming most of you use FSUIPC already, if not Google what it does and get it). FlightsimPM has some button boxes/overheads for various types. I would just caution against the quality control here, but the throttle I purchased from them works brilliantly!
Overhead. As mentioned, there are various overhead panel producers on the market with varying levels of build quality. These range from plug-in units to self-assembly items. This will usually require some form of frame to mount and can help form the enclosure or ceiling part of the home cockpit. A quick Google search will show you all the options (most being 737 and then A320). However, you can buy panels for a lot of different types if you are willing to learn the wiring and switches yourself. (Opencockpits, Cockpitsimparts VRinsight, and Flightdeck solutions all make overheads). One alternative is to use Aviaserver (the same company that did the remote FMC on your iPad) and purchase their overhead software. This will then use a webpage that shows your overhead on a separate monitor (or computer). This can then be manipulated using a mouse or touchscreen. This comes with a try before you buy demo version too.
Aviaserver overhead example.
Enclosures / Lighting
Cockpit enclosure. This is something that really takes your home cockpit to the next level. A lot of people shy away from the enclosure part of the home cockpit because of space and or ability. It is relatively cheap to make with wood and it can be made fairly easily with some time and research. It can take the shape of a few pieces of wood surrounding your main monitor, or something more ambitious that you mount your overhead panel to that can enclose your space. The level of immersion from building some form of surround is definitely worth the cost offset.
Lighting. With all the previously mentioned parts of the home cockpit (even if you just purchase the elements and stick with your desk), people often forget or overlook the lighting aspect. I really like to use LED lights, not only can you make them look very professional for very cheap, but they can also look exactly like real aircraft. A string of LED lights from Amazon etc isn’t very expensive, purchased together with an LED light cover (as seen in the pictures below), can make it look very professional. If you buy one with the correct attachment you can also purchase a cheap dimmer to connect to it and that will then allow you to dim the lights as you need to for day/night flying.


The above images show my last build with simple LED lights under the glare. The LEDs are stuck to a metal housing and then a plastic cover is put on. Once the glare is mounted in the final picture, wires are run through small holes in the panel to a plug socket behind. The image at the end is the final result. All LED parts available from Amazon.
Seats and having your butt kicked
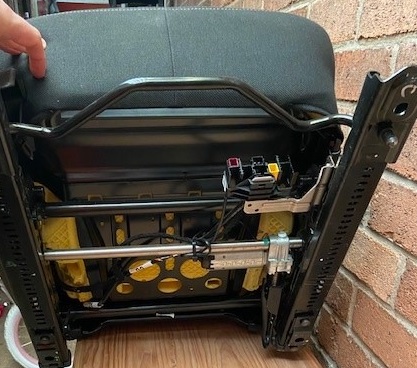
Seats. When simming, most people will settle for using just their office chair. Occasionally people will upgrade to a gaming chair for some extra support. These are all well and good. However, there is an easy way to try and recreate a cockpit seat for not very much money. I first tried this a few years ago and have been using it ever since, it is going to sound simple at first, but hear me out.
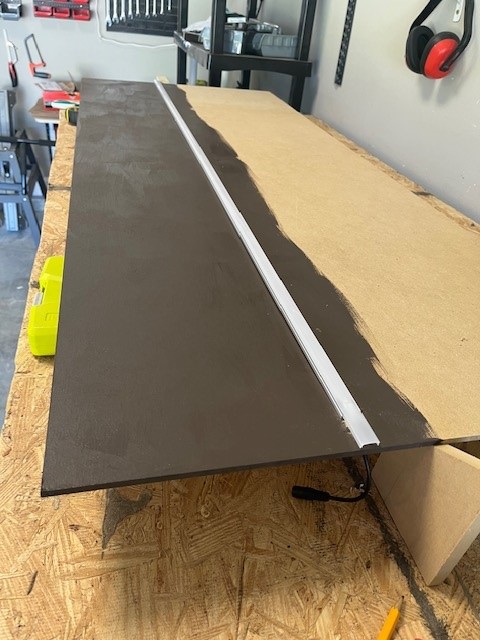
First, I would go to a car breaker's yard and ask for a car seat. There are a huge amount of cars being broken up at any time, and usually, they will charge you around £20 for a car seat that would be destroyed anyway (if you can get one with L and R armrests then that's a bonus, but I usually don't bother). Ask them to remove it for you. make sure when you do that it comes with the runners underneath. Manual runners are easier, so you don't need a power source to power your automatic seat. Check the operation of the runners and the backrest tilt too. Now you have your car seat in the garage at home, take a little time to clean it up and make it look how you want it. I recommend going on Amazon and buying a white fake sheepskin car seat cover (I think they are around £20 too). Now you have a car seat that sort of looks a bit like an aircraft seat. measure the distance between the holes on the underside of the runners on the bottom. Head over to your local DIY shop and grab some wood. I have always used MDF, it is cheap and not quite as sturdy, but if you get it thick enough then it's fine. At this point, you want to create a box to mount your chair runners on. Now when you put the box in your sim, you have a seat that looks a bit like an aircraft seat, it's cheap and gets rid of the annoying office chair wheels. You can experiment with adding other bits and pieces to it as you need to for aesthetics.
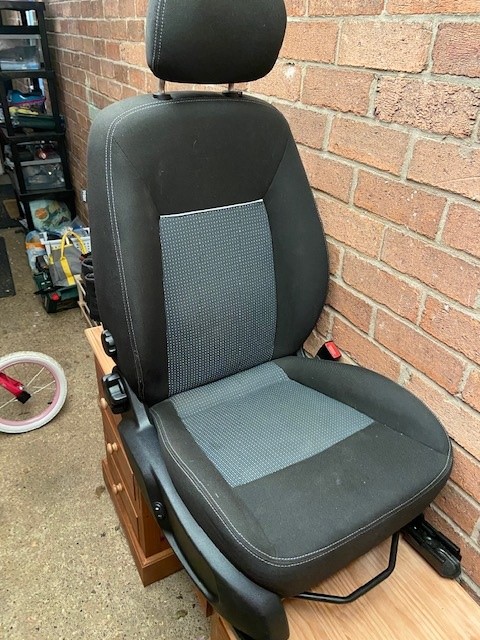
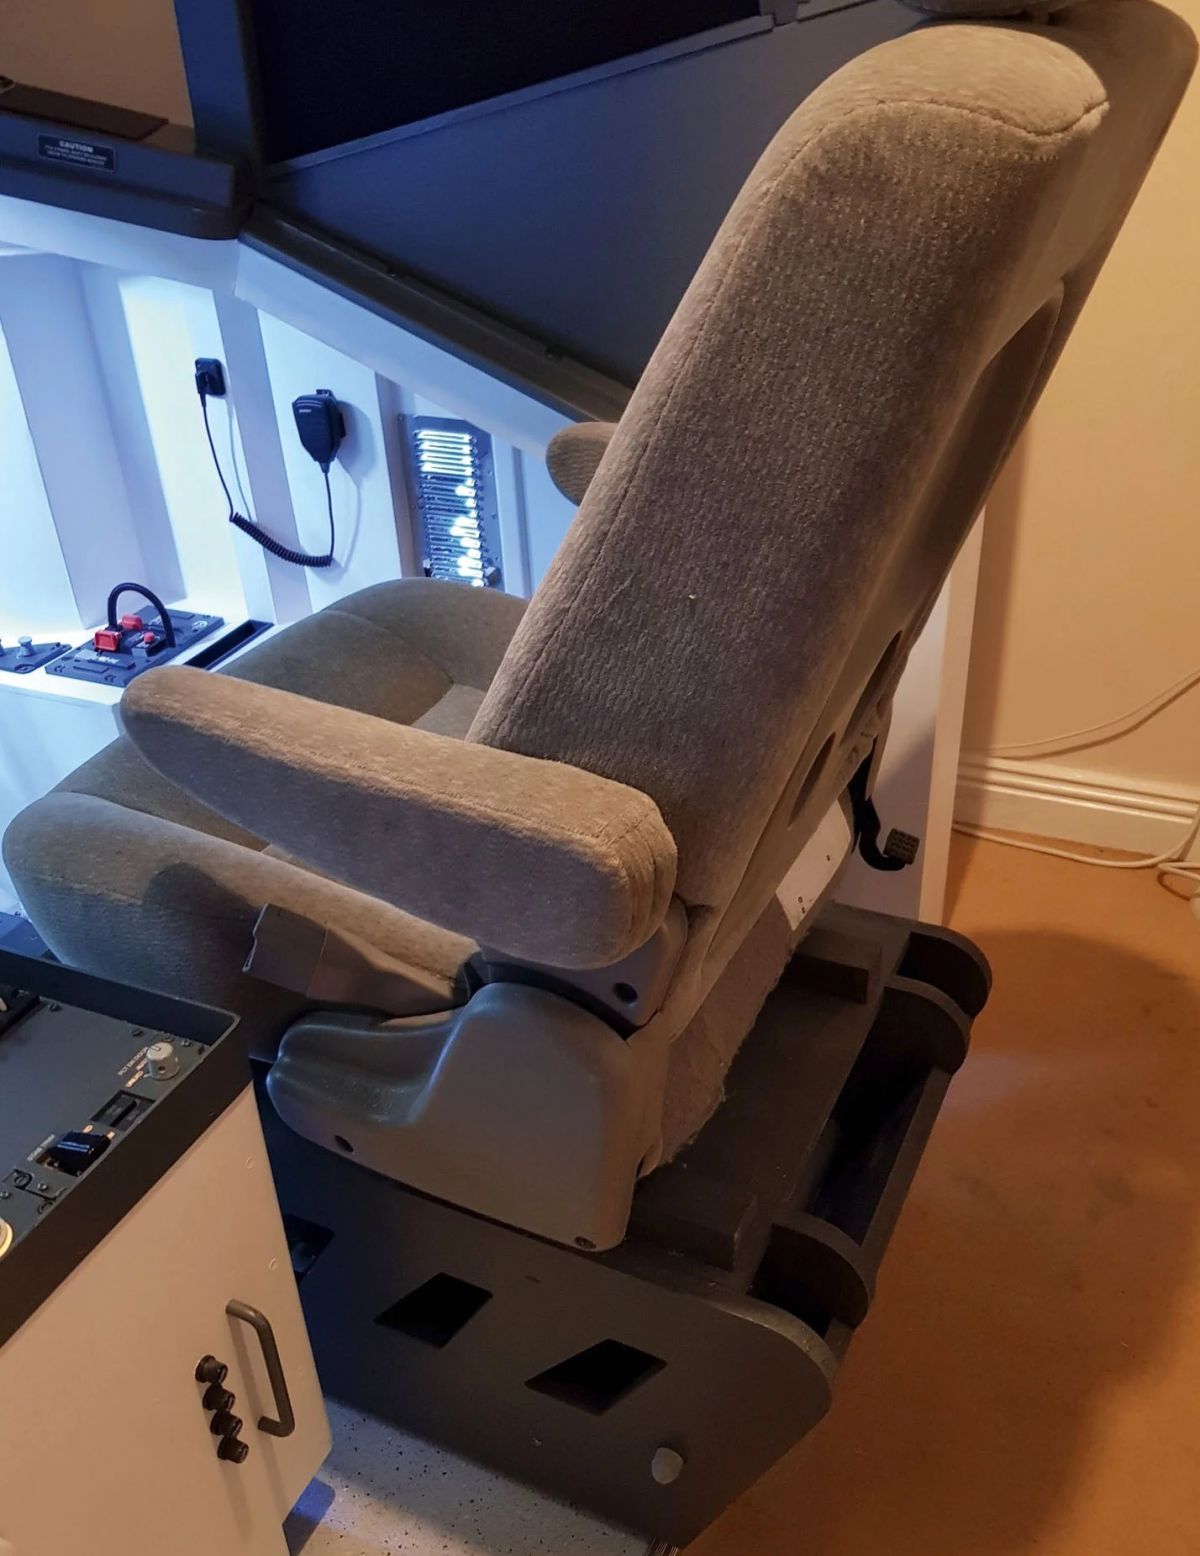
The image at the end is an example of the final version of the seat, minus the sheepskin cover. The base has been created from wood, but a simple box structure will suffice.
Butt Kicker. The final level of immersion I would add is a Butt Kicker (or a product like it). This is an amp attached to a vibrating arm. It is designed to attach to your chair and vibrate everytime sound is played. So when you extend the speed brakes you feel a vibration in your seat. When you have a hard landing, your seat vibrates. This adds a huge amount of immersion. You can also add it to the underside of your home made cockpit seat above (before you attach the car seat to the box you made). I recommend the Gamer 2 version of Butt Kicker. It is what I use and have had no issues with it at all.
How many computers and the dreaded software...
Computers. I have based what I have said so far on the fact that most people seem to want to use only one computer. This is normally down to money and that they want to fly different types of aircraft. They want to be able to see an external view of their baggage being loaded at the gate and take screenshots of the aircraft when they are flying in the cruise etc. However, if you get a little more serious about home cockpit building, there are companies out there that make avionics software that can be run on multiple computers over a network to spread the load, specifically for a home cockpit. Sim avionics, Project Magenta, Prosim, Aerowinx, majestic, Ifly and JeeHell are just some of the companies that make home cockpit software. They vary in price point but are usually more expensive than normal software such as PMDG, Aerosoft etc (I think jeeHell might still be free though). the reason for this is simple, they are study-level avionics packages designed to replicate the aircraft systems exactly as they would in real life. So, you can run your home cockpit visuals (looking out of the window) on one PC, and the instruments can be run on a separate PC(s), allowing your visual computer to concentrate on only the visuals. Software like PMDG, Aerosoft and the others like them also have to focus on recreating a virtual cockpit, great exterior textures and other eye candy. Home cockpit software producers usually do not include these and therefore it helps to run smoother. The bottom line, figure out what it is you want from your build. If you want to fly lots of different types and use only 1 computer then PMDG and Aerosoft etc are probably fine for you. If you want to build an in-depth cockpit, fly only one aircraft type that one day will look like an actual airliner cockpit and you aren't concerned about all the eye candy and exterior views of the aircraft, look into some home cockpit building software.
General Software. I will be honest here, I didn't really want to write anything about software. There are just too many variables and options depending on preference and baseline sim (MSFS, P3d, X-plane etc). However, I would be remiss if I didn't at least mention it. Therefore I am going to take a different approach and only talk about software that I think enhances the home cockpit build process and not all the sim software out there.
FSUIPC. Number one on the list for me is FSUIPC. This utility allows you to bind flight controls, manipulate buttons and many other functions. It creates macros and also allows button presses that cannot be set up through flightsim button assignments alone. I use the payware version for P3d, so it comes with a little extra functionality over the free version. I believe FSUIPC is also available for X-plane and MSFS. There are far too many functions to go through but have a look on Youtube etc and you will soon see the benefits.
Aivlasoft EFB V2. Already been mentioned but great EFB utility. Can give you checklists too, and when used in conjunction with TOPCAT can give limited take-off performance calculations (TOPCAT is no longer supported)
PFPX. Performance and flight planning tool.
SPAD and LINDA. Software to help drive hardware such as Saitek panels. Both come with downloadable profiles to help make the process easier.
Aviaworx. Utility for having a stand-alone FMC, EFB or overhead on an iPad or second monitor.
Virtual Avionics. Utility for having a stand-alone FMC on an iPad or second monitor.
Wideview. Allows multiple computers to be linked to ease some of the load when building a home cockpit.
Conclusion
So, to summarise. I think at a virtual airline like FlyUK, there will be people at all stages of the home cockpit build that I have talked about. Some starting out with just a joystick and a mouse. Others (I suspect the majority), will have most of the hardware I have discussed, but still operating on their desk. Finally, there will be the ones who have ditched the desk and built something that is starting to look like an actual home cockpit. The more you decide to build, the less you will find yourself interacting with the virtual cockpit and the more you will interact with your actual home-built cockpit. My number one goal when I built my first home cockpit was to get to the stage where I didn’t need to press any buttons in the virtual cockpit or use my mouse/keyboard to complete a flight. This obviously took time, but I got there in the end. It didn’t look pretty because I didn’t plan it well, but I didn't care as I learned and moved on and then focused more on aesthetics when I got around to updating the cockpit. Once you have the hardware, you can really arrange it how you want it.
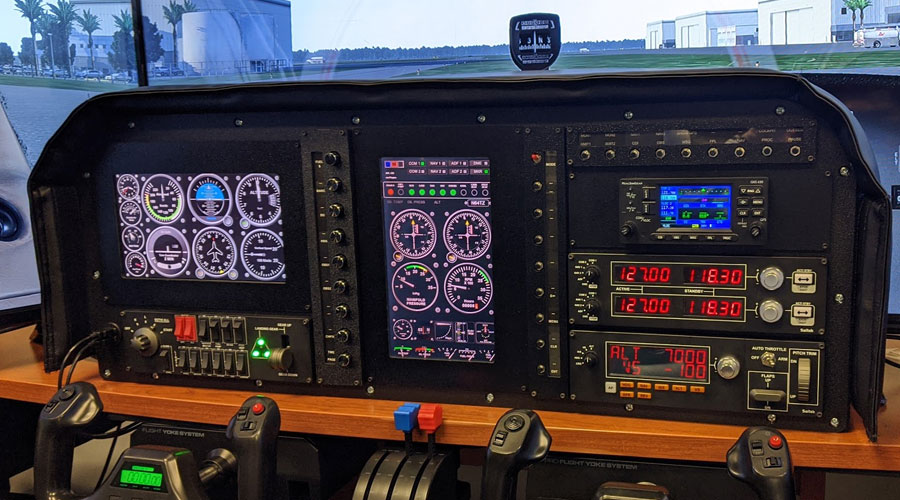
If you can afford it, you can just go out and purchase something like the following...
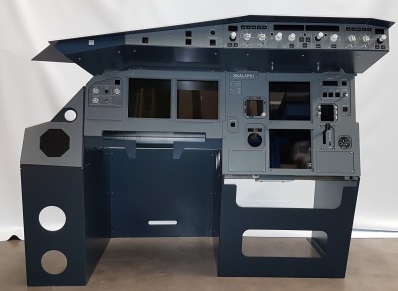
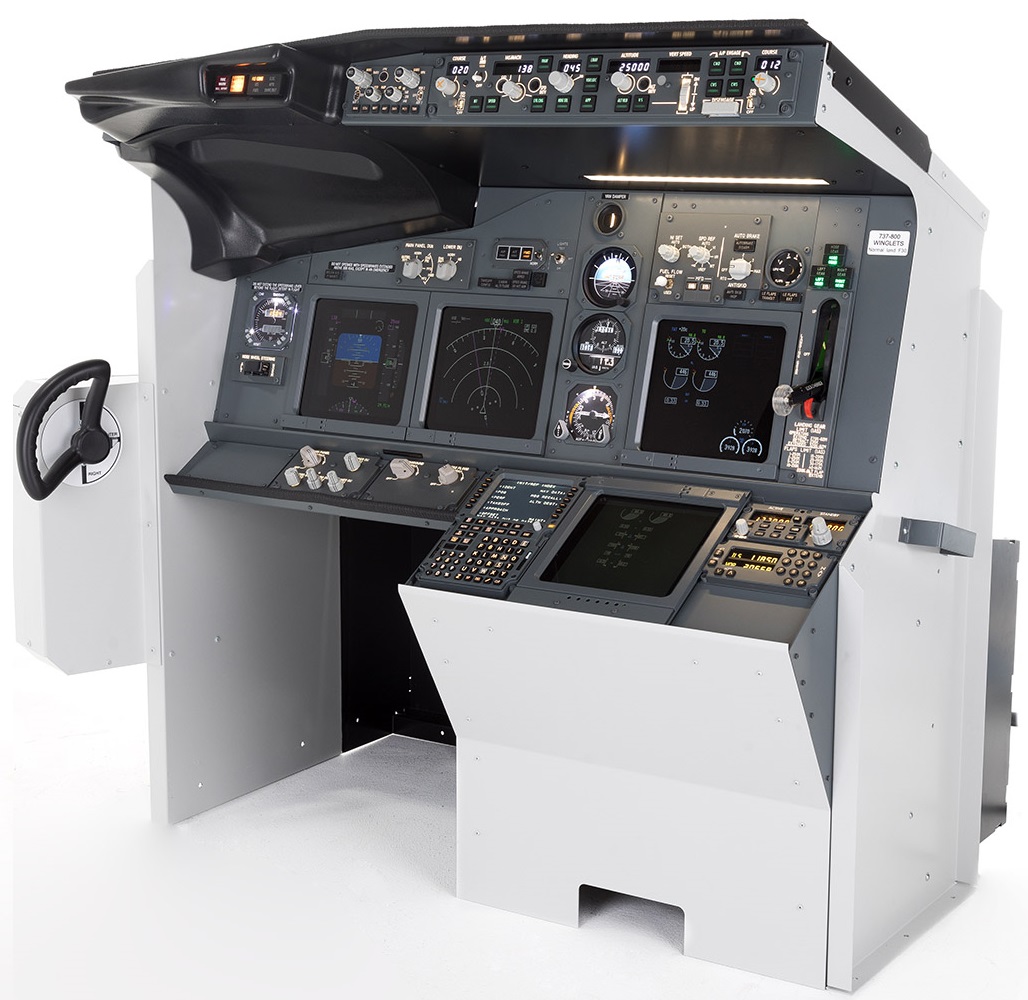
Both will set you back thousands of pounds, and although undoubtedly they are excellent home cockpits, built very well and an easy solution, you can certainly save a lot of money by grabbing some wood instead.
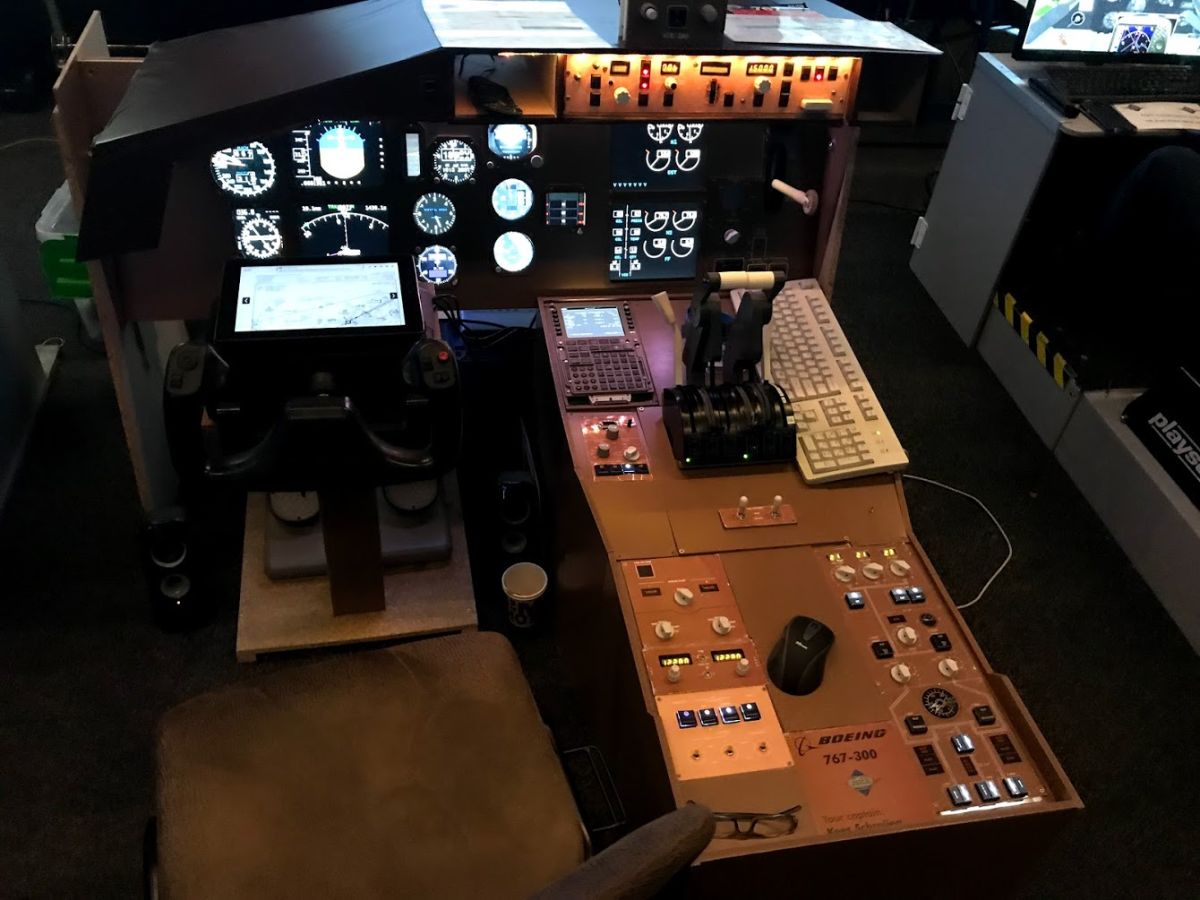
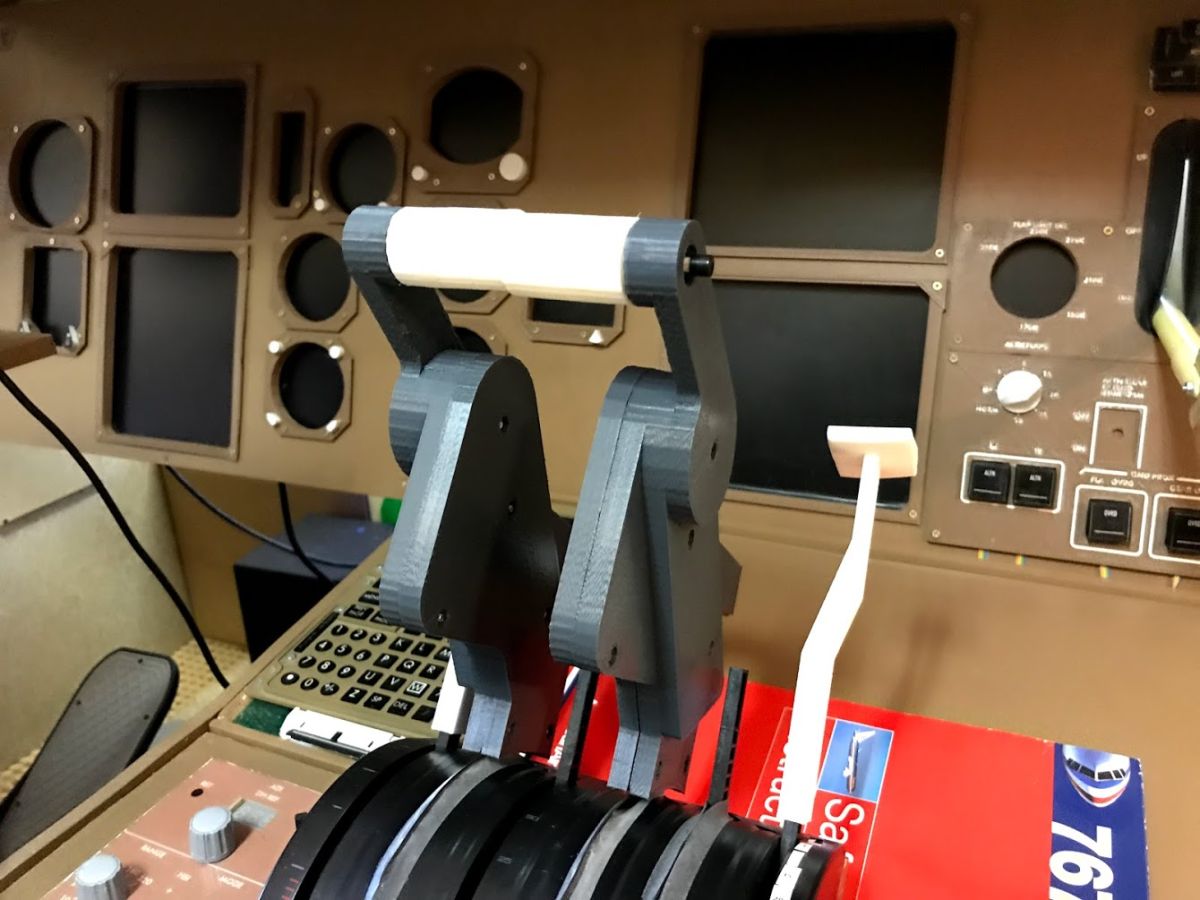
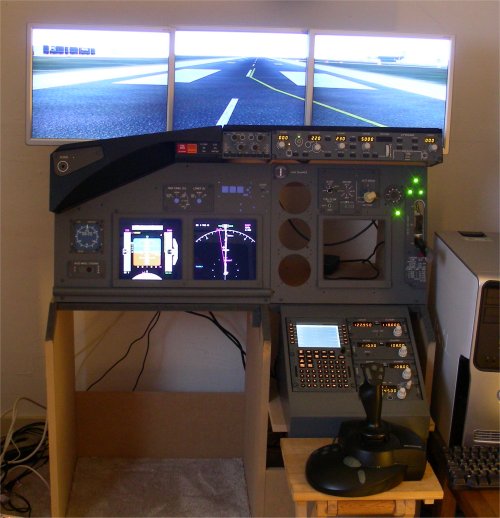
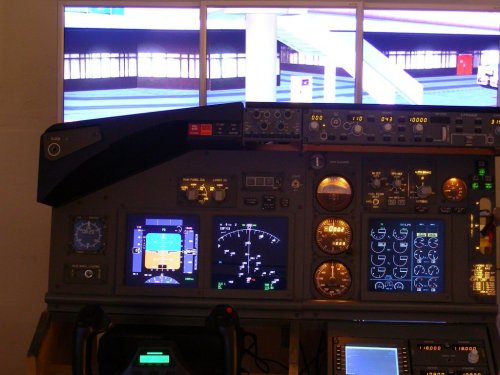
I really like the images above. It shows the art of the possible. This is all built using wood, with a few monitors placed on the structure behind it. There are 2 x Saitek throttles with handles, a CH yoke and pedals, some stickers and a little imagination.
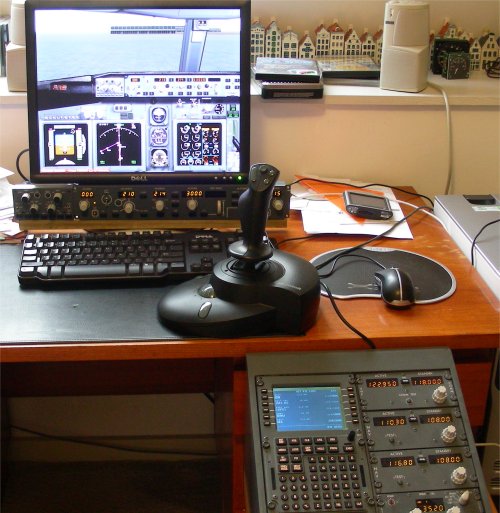
If you absolutely cannot get rid of your desk, the above image shows you how you can make a setup that can easily rest on it. It may take you longer than 10 minutes to take it down if you need the desk, but hopefully, you can see the level of immersion it can create. This is using a larger monitor behind for the visuals, a second monitor for the instrument panel, the virtual FMC we have discussed and a Saitek Yoke and switch panel with a few extra switches. I believe that is also a Goflight MCP autopilot unit we have also mentioned here.
It really is a marathon, not a sprint. Some of the items I have mentioned are quite expensive, some are not. Lots of the massive home cockpits you see on Google or Youtube look amazing, but they started 10 years ago with the purchase of a single autopilot unit or FMC and they have been building on that ever since. The above examples are just a few of the many that are out there. I encourage you to use Google and Youtube and see what the art of the possible is. Also, there is a home cockpit building thread on the Fly UK forum, feel free to post. Maybe there are other like-minded people out there who have the same idea as you.
Happy building!
Matt king
Comments
This is a community-moderated forum.
All post are the individual views of the respective commenter and are not the expressed views of Fly UK Virtual Airways.
By posting your comments you agree to accept our Terms & Conditions.

Categories
Featured Posts
Fly UK Attends FlightSimWeekend 2026

Fly UK 2024 Survey results

F1 2026 Tour Launches February 1st
A Year of Tuesday Night Flying on VATSIM
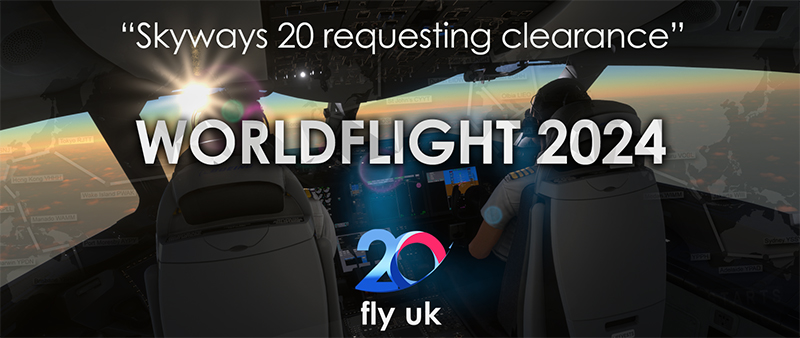
Fly UK Takes on the World: WorldFlight 2024
Latest Posts

WorldFlight 2026 - Be part of the crew
Fly UK Attends FlightSimWeekend 2026

Fly UK is recruiting and staff updates
Fly UK 2024 Survey results